Great praliné paste is built on four pillars: a careful roast, well-managed caramel, controlled grinding, and smart fat balance. Nail those, and you walk away with something silky, stable, and packed with deep toasted-nut flavor. Miss one, and you’re left poking at a grainy, oily paste that refuses to behave in your fillings.
The good news is that most failures trace back to a handful of controllable steps. Overheated sugar, poor particle-size control, and oil separation account for the vast majority of ruined batches. Once you understand how to make praliné paste with those three risks in mind, your results stop being a matter of luck and start being a matter of method.
Here’s what you’ll learn:
- The full praliné production workflow, step by step
- Why does texture turn grainy, sandy, or split
- How to stabilize paste for different applications
- How to rescue a batch that’s already gone wrong
This guide is written for working chocolatiers, small-batch producers, and serious home makers who want repeatable results.
What Is Praliné Paste?
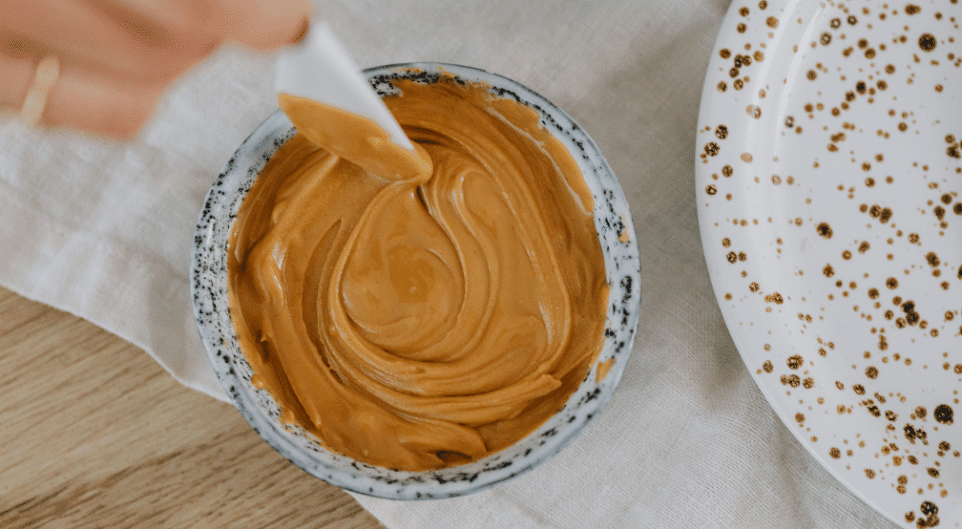
Praliné paste is caramelized nuts ground into a smooth, flowable paste. That caramelized sugar is the heart of it. It’s what sets praliné apart from a plain nut paste and lends that deep, toasty sweetness. Flavor alone isn’t the finish line, though. You’re after a stable, smooth texture that holds up in whatever you build with it.

How Praliné Paste Differs from Nut Butter
Nut butter is just ground nuts, sometimes with a pinch of salt or a little oil. Praliné paste folds caramelized sugar into the picture, and that changes everything downstream: the flavor, the sweetness, and the way the paste behaves once it lands in a filling or spread. The sugar also shapes how the paste grinds and sets, which is exactly why technique carries more weight here than it does with a basic nut butter.
How Praliné Paste Differs from Gianduja
Gianduja takes the idea one step further. It blends praliné (or a nut paste) with chocolate and extra sugar to create a softer, chocolate-forward product. Think of praliné paste as the nut-and-caramel base, and gianduja as what happens once chocolate joins in. Knowing the distinction helps you choose the right starting point for your recipe.
Common Uses in the Chocolate Shop
Praliné paste pulls its weight in a lot of places:
- Bonbon and truffle fillings
- Spreadable jars for retail
- Layered desserts and tarts
- Ice cream and gelato bases
- Crunchy inclusions and feuilletine mixes
That range is precisely why a smooth, stable paste is worth the effort to get right.
Step-by-Step Praliné Production Workflow
A smooth, stable paste comes from a repeatable sequence, not guesswork. Work through these steps in order, and you’ll strip out most of the variables that cause trouble.
Step 1 — Choose and Inspect the Nuts
Start with fresh nuts. Hazelnuts and almonds are the classics, but the principle holds across the board: quality in, quality out. Before you commit a batch, give the nuts a sniff. A paint-like, sour, or stale aroma signals rancidity, and even a trace of rancid fat can spoil the whole paste. When in doubt, taste a few.
Step 2 — Roast for Flavor Development
Roasting builds the toasted depth that defines a good praliné. Roast the nuts evenly and judge doneness by internal temperature rather than by surface color, which tends to mislead. A light, even roast draws out warmth and sweetness; push too far, and the nuts turn harsh and bitter. Aim for a controlled, golden roast, then let the nuts cool slightly before moving on.
Step 3 — Caramelize the Sugar
This is where most batches live or die. Cook your sugar to a clean caramel and watch the temperature closely. Lighter caramel develops around 165–170°C, while deeper, nuttier notes arrive near 175–180°C. Above roughly 185°C, the sugar tips into bitterness, so pull the caramel off the heat a few degrees early to account for the carryover heat still in the pan.
Step 4 — Cool and Break the Mass
Fold your roasted nuts into the hot caramel, then spread the mixture thin on a silicone mat. A thin layer halts the cooking quickly and keeps the caramel from scorching as it cools. Let the mass cool and harden completely before grinding. Grinding a warm, sticky mass is a fast track to a gummy, uneven texture.
Step 5 — Grind to the Target Texture
Break the cooled caramelized nuts into pieces and grind them in stages. Working in stages keeps the machine from overheating, which protects the nut oils. You’ll watch the mixture move from coarse crumbs to a thick paste to a smooth, flowable consistency as the nuts release their oil. Patience here pays off directly in mouthfeel.
Step 6 — Adjust Fluidity and Finish
Once you reach a smooth paste, taste it and check the texture. If the formula needs more flow, add a small amount of melted cocoa butter and grind briefly to combine. Add it gradually so you don’t overshoot. When both the flavor and the consistency suit your application, the paste is done.
How Roasting and Caramelization Affect Flavor and Texture
Roasting and caramel set the flavor ceiling for your praliné, and they quietly shape how cleanly the paste grinds later. Treat these two stages as the foundation, not just prep work.
Getting the Roast Right
Under-roasted nuts taste flat and a little raw, missing the warmth that makes praliné special. Over-roasted nuts swing the other way, turning harsh and acrid. The sweet spot is an even, controlled color from edge to center. Stir or rotate the nuts as they roast so they color uniformly, and pull them while they’re fragrant and golden rather than dark.
Dry vs. Wet Caramelization
You have two routes to caramel. Dry caramelization melts the sugar without added water, which can yield a cleaner caramel note and skips the step of cooking off extra moisture later. The trade-off is vigilance, since dry caramel can scorch quickly.
Wet caramelization adds water to the sugar at the start, giving you a little more breathing room in the early stages. The catch is crystallization. To keep the wet caramel smooth, keep the pan walls clean, avoid unnecessary stirring, and consider adding a touch of glucose or invert sugar to discourage the sugar from recrystallizing.
Preventing Bitterness and Crystallization
Both methods reward a thermometer over a guess. Track the temperature, stop the cook early to allow for carryover, and stay put during the final minutes. That’s the window where caramel slides from amber to bitter before you’ve had time to react.
How Grinding Affects Texture
Texture is decided at the mill. Once your caramelized nuts are cool and ready, friction heat and grind time matter more than almost anything else.
Food Processor vs. Melanger
A food processor handles coarser textures and small test batches well. It’s fast and accessible, but it tends to stall short of a truly fine, professional smoothness. A stone melanger grinds for hours, delivering an ultra-smooth paste. If your goal is a velvety bonbon filling, the melanger is the tool that gets you there.
Friction, Heat, and Oil Damage
Grinding generates heat, and too much of it damages the nut oils, leaving you with a greasy, broken result. Keep the mixture cool as you work. Grinding in stages, pausing when needed, and steering clear of long uninterrupted runs all help protect the oils and keep the paste stable.
Target Particle Size for a Smooth Mouthfeel
Smoothness comes down to particle size. For ultra-smooth professional fillings, many producers grind to a very fine particle size that feels velvety on the tongue. Coarser grinds suit more rustic textures, where a little grit is part of the appeal. Decide which you’re after before you begin, since it dictates how long you run the mill.
Why Praliné Turns Grainy, Sandy, or Split
Most failures fall into a few clear categories, and naming the problem usually points you straight to the fix.
Grainy or Sandy Texture
A gritty, sandy texture typically comes from re-crystallized sugar or an incomplete grind. If the caramel crystallized during cooking, those sugar crystals carry right through to the paste. The remedy is often a second pass through the mill to redistribute the sugar and refine the texture.
Oil Separation
When liquid fat from the nuts pools on top of your paste, that’s oil separation. It usually points to an unbalanced recipe or storage temperature swings. A small amount of cocoa butter, whisked in gently, can help build a more stable fat structure and bring the paste back together.
Fat Bloom in Finished Fillings
If you’ve combined praliné with chocolate and later spot white streaks, that’s bloom. It’s generally tied to poor temperature in the added fats or temperature swings during storage. Re-melting and properly tempering those fats usually clears it up.
How to Rescue or Repurpose a Failed Batch
A split batch isn’t always lost. Slowly whisk a little warm cocoa butter into the paste to re-emulsify it. If it won’t come together smoothly enough for a refined filling, don’t throw it out. Fold it into spreads, ganache, or baked goods, where flavor matters more than a flawless texture.
How to Stabilize Praliné for Different Applications
The right consistency depends entirely on what you’re making. The same paste requires different handling for a bonbon than for a jar on a shelf.
Bonbon Fillings
For bonbons, aim for a smooth, flowable paste that still holds its structure once set. A little tempered chocolate or cocoa butter gives the filling body and a clean cut. Grind fine enough that the filling reads as velvety rather than gritty.
Spreadable Jars
A retail spread should remain looser and well-emulsified so it pours and spreads smoothly at room temperature. Balance the fat carefully so the paste stays homogeneous on the shelf instead of separating into layers.
Slabbed or Layered Centers
For slabbed or layered centers, you want a firmer paste that holds a clean cut. Balance the fat so the center sets without cracking, and let it firm fully before cutting for sharp, even portions.
Crunchy Inclusions and Feuilletine Mixes
If you want crunch, fold in feuilletine, cocoa nibs, or chopped toasted nuts after grinding. Adding them at the end keeps the crunch intact rather than grinding it into the paste.
Storage and Shelf-Life Tips
Praliné keeps best away from moisture, heat, and air. A few simple habits go a long way toward protecting both flavor and texture.
Best Containers and Headspace
Store finished praliné in airtight containers with minimal headspace. Less air in the jar means slower oxidation, which helps preserve that fresh, toasted flavor.
Temperature and Humidity
Hold your storage space around 60–65°F with low humidity. Steady, cool conditions limit sweating and bloom, while temperature swings invite oil separation and surface problems.
When Flavor Starts to Fade
Flavor and texture degrade over time, and the rate depends on the recipe, fat content, and storage conditions. Rather than relying on a fixed date, judge each formula on its own merits. Taste periodically, and save your fresher batches for your most refined work.
Essential Tools for Precision Work
You can’t run on intuition alone once you’re scaling for production. The right tools give you the data and consistency the process demands.
For Temperature Control
A reliable thermometer beats guessing every time, especially during caramelization. An infrared thermometer is handy for tracking the cooling curve of the nut mass without any contact.
For Even Heat
A heavy-bottomed copper or stainless steel pan distributes heat evenly during caramelization, reducing hot spots and the risk of scorching your sugar.
For Grinding and Portioning
A stone melanger delivers smooth paste at volume, a strong blender handles small experimental batches, and a guitar cutter gives you uniform portions when you’re working with slab-cut centers.
Quick Troubleshooting Table
When something goes wrong, use this table to diagnose the issue and decide what to do next:
| Problem | How It Looks | Likely Cause | Quick Fix | Best Use Afterward |
|---|---|---|---|---|
| Grainy/sandy | Gritty, dull | Crystallized sugar or coarse grind | Re-pass through the mill | Fillings, spreads |
| Oil separation | Oil pooling on top | Unbalanced fat | Whisk in warm cocoa butter | Spreads, baking |
| Too thick | Won’t flow | Over-ground or low-fat | Add a little cocoa butter | Bonbon fillings |
| Bitter flavor | Harsh, burnt | Overheated caramel | Blend with a milder paste if only slightly off | Limited use |
| Bloom on filling | White streaks | Temper or storage issue | Re-melt and re-temper added fats | Baking, melting |
Frequently Asked Questions
Why is my praliné grainy instead of smooth?
Graininess usually comes from re-crystallized sugar or an incomplete grind. Pass the paste through the mill again to redistribute the sugar and refine the texture, and make sure your caramel didn’t crystallize during cooking.
Why is oil pooling on top of my praliné paste?
That’s oil separation, often caused by an unbalanced recipe or storage temperature swings. Whisk in a small amount of warm cocoa butter to rebuild a stable fat structure, and store the paste in a cool, steady environment.
Can I make smooth praliné in a blender?
You can make a reasonably smooth paste for small batches, but blenders struggle with sugar and can heat the nut oils. For an ultra-smooth, professional texture, a stone melanger is the better tool.
What is the ideal texture for a praliné filling?
For bonbon fillings, aim for a smooth, flowable paste that still holds structure. Add tempered chocolate or cocoa butter to firm it up, and grind fine enough that it feels velvety rather than gritty.
Do I need to peel hazelnuts before making praliné?
Peeling removes bitter, papery skins and gives a cleaner flavor and smoother paste. It’s worth the extra step for refined fillings, though some makers leave the skins on for a more rustic profile.
How long does praliné paste last?
It depends on the recipe, fat content, and storage. Kept airtight in a cool, dry, low-humidity space, praliné can last for weeks to months, but its flavor and texture slowly fade, so judge each batch on its own merits.
Can split praliné be fixed?
Often, yes. Slowly whisk a little warm cocoa butter into the paste to re-emulsify it. If it won’t come back together for a smooth filling, repurpose it as a spread, ganache, or in baked goods.
What is the difference between praliné paste and nut butter?
Nut butter is simply ground nuts. Praliné paste adds caramelized sugar, which changes the flavor, sweetness, and behavior of the paste in fillings and spreads.
Can I use cocoa butter to thin praliné?
Yes. A small amount of melted cocoa butter improves flow and stability. Add it gradually so you don’t overshoot and end up with a paste that’s too loose for your application.
What temperature should I caramelize sugar to for praliné?
Lighter caramel develops around 165–170°C, with deeper, nuttier notes near 175–180°C. Above roughly 185°C, the sugar turns bitter, so pull it off the heat a few degrees early to allow for carryover.
Smooth praliné paste comes down to respecting each stage of the process: fresh nuts, an even roast, well-controlled caramel, patient grinding, and balanced fat. Move through the steps in order, trust your thermometer over your instinct, and keep a close eye on the texture of your grind. When a batch does go sideways, name the problem first, then reach for the matching fix. Master the fundamentals once, and you can push confidently into new flavors, ratios, and inclusions while holding every batch to a professional standard.